Darwin Iso Vmware
The various VMware Tools downloads are located under the packages folder for each version.
Create a macOS/OS X VM on VMware ESXi 6.5 & VMware Workstation 12.5.2 Pro Running a MacOS/ OS X virtual machine is not anything new and has been supported for quite some time, as long as you are running said VM on a supported hypervisor with Apple Hardware. But many of the “Non-Apple” users in the world would not be able to take advantage this without owning some type of Apple Computer.
Luckily, there is an alternative method to running a Mac-based VM on non-apple hardware-based VMware ESXi and/or VMware Workstation for Windows! In this tutorial, I am going to show you just how to do so. Please keep in mind that the methods described in this article are not supported nor endorsed by Apple or VMware in any way, so please use at your own risk. Before we can begin, there are a few tools required to ensure this works flawlessly. • macOS Sierra installation media in.iso format (You can use an older OS as well but for this demo, I will be installing macOS Sierra 10.12.3) • This media will have to be created as the OS comes as an.app by default. • This has a good tutorial for creating said media. • Unlocker Utility • Current Stable version works up to OS X Yosemite on ESXi 6.0 and Workstation 11 • Version RC adds support for macOS Sierra on ESXi 6.5 and Workstation 12.x • Type 1 Hypervisor (ESXi) or a Type 2 Hypervisor (VMware Workstation) Ready?
I’ll start by showing you how to create a macOS Sierra VM on VMware Workstation 12.5.2 Pro. VMware Workstation 12.5.2 Pro • Make sure that VMware Workstation is installed but not running.
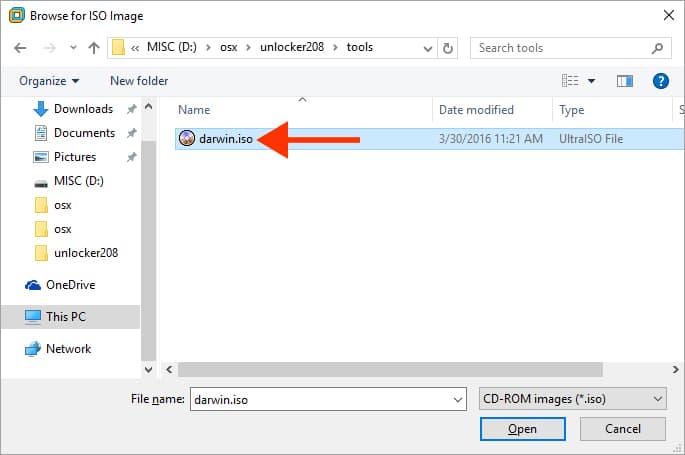
• Extract the contents on the Unlockler 2.0.9RC. Kp astrology software in tamil. • Open a command prompt and navigate to the extracted folder • Run win-install.cmd. This will patch your VMware Workstation to unlock the capabilities to run a Mac OS. It will also download the latest VMware Tools (darwin.iso) for macOS into the extracted directory. • Launch VMware Workstation and create the shell VM • When choosing the hardware compatibility, you can optionally change this to version 10 so that you do not need to manually edit the.vmx file after the shell has been created. • I am going to leave it at version 12 and manually edit the.vmx file afterwards.
Continue creating your shell by following along • Now that we have the shell created, we still need to attach the ISO to the VM. Click on the CD/DVD (SATA) option on the left side in the Devices pane. Once in the settings, select the ISO image.
The Great Mississippi Flood of Not only will it drive traffic and leads through your content, but it will help show your expertise with your followers. Joe Casson rated it it was amazing Jul 02, To see what your friends thought of this book, please sign up. Darksiders 2 artbook download.
• Next, navigate to the directory that houses the virtual machine’s files. Edit the.vmx file with your preferred text editor. I personally love using NotePad++. Scroll to the bottom of the text and add the following line. This will enable the VM to boot up.